How to Transfer Domain from GoDaddy to Hostinger in 2025? Complete Guide
How to Transfer Domain from GoDaddy to Hostinger in 2025: Transferring a domain to a new registrar is a common practice. You might want to do it to save on renewal costs, get better services and support, or simply move your domain to the same provider as your hosting.

Fortunately, transferring a domain from GoDaddy to Hostinger is simple. In this article, we will cover the steps in detail.
Domain Transfer Checklist
Before transferring a domain name from GoDaddy to Hostinger, make sure you meet the following criteria:
- The domain must be at least 60 days old – Domains can only be transferred to another registrar at least 60 days after registration or last transfer. This rule, enacted by the Internet Corporation for Assigned Names and Numbers (ICANN), helps protect against unauthorized transfers.
- Up-to-date contact information – Keep your contact information updated on GoDaddy to ensure the domain transfer confirmation email goes to the correct address.
- Access to authorization code – You will have to input an authorization code (also called an EPP code) from GoDaddy to Hostinger to verify your domain ownership.
How to Transfer Domain from GoDaddy to Hostinger?
After you’ve ensured your domain is eligible for transfer, follow these steps to move your domain from GoDaddy to Hostinger.
1. Unlock the Domain at GoDaddy
Domain lock prevents unauthorized changes, so you must unlock your domain at GoDaddy first to be able to initiate a transfer:
- Sign in to your GoDaddy account and go to the Domain Portfolio page.
- Click on the three-dot icon next to the domain name you want to transfer and select Turn Lock Off.
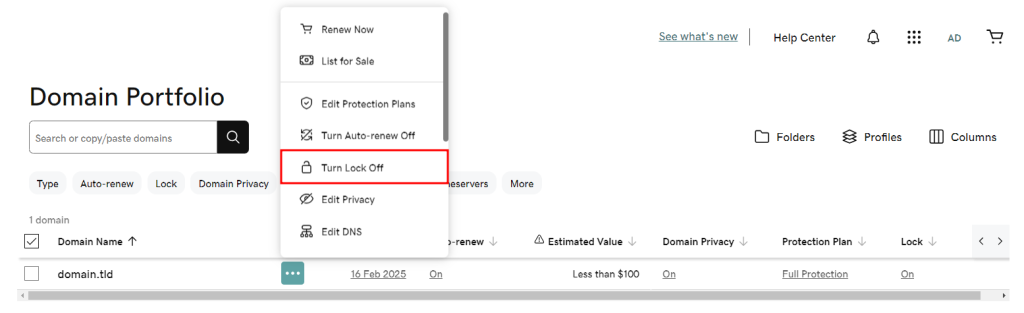
- Read the disclaimer and click Continue & Verify.
- If Domain Protection is enabled, verify your identity by entering the code sent via SMS or an authenticator app.
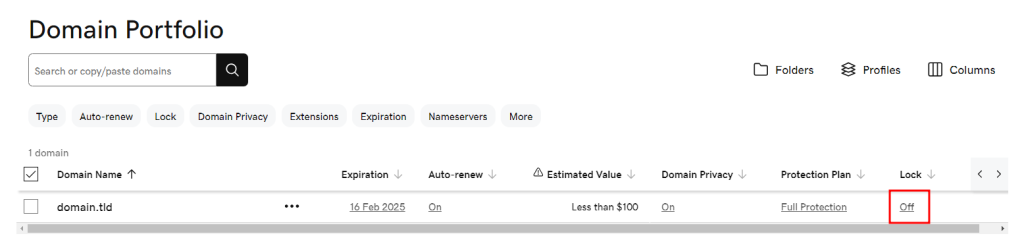
- If the process is successful, the domain lock status should change to Off.
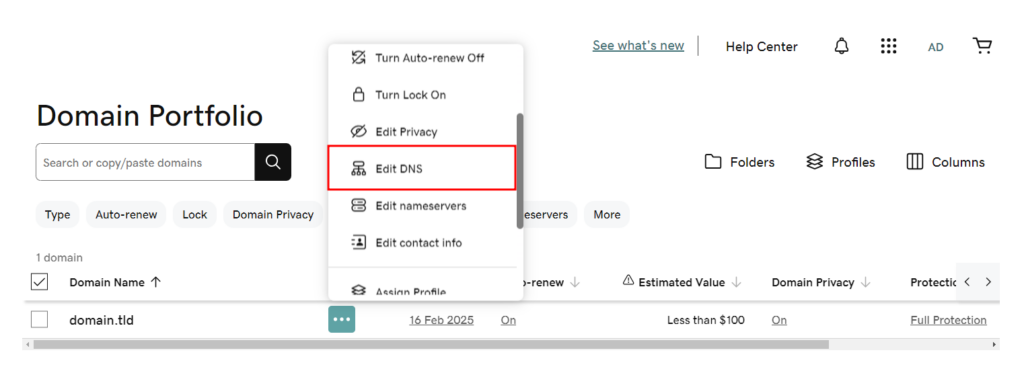
2. Point the Domain to Hostinger’s Nameservers
To minimize downtime on your website and email services, point your domain to Hostinger’s nameservers before starting the transfer process:
- Open the Domain Portfolio page on GoDaddy.
- Click on the three-dot icon next to the domain name you want to transfer and select Edit DNS.
- Open the Nameservers tab and select Change Nameservers.
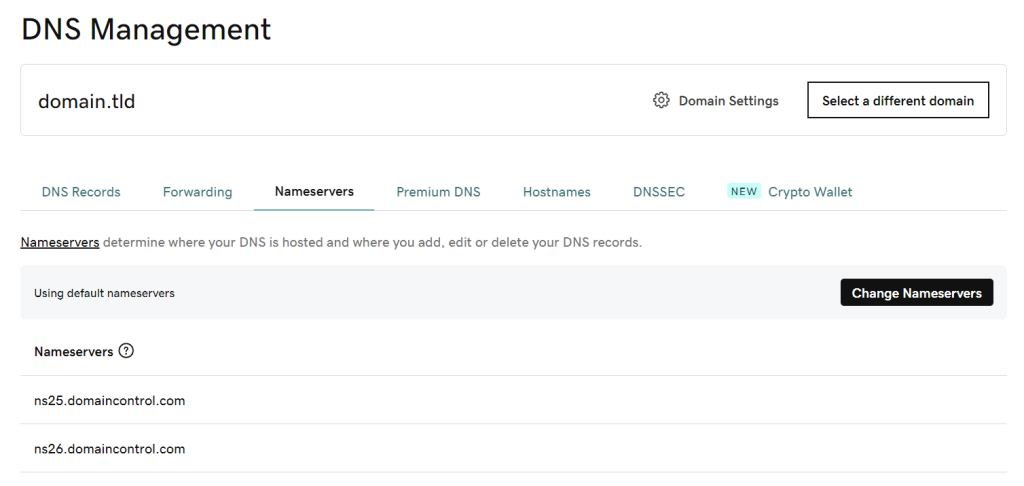
- Choose I’ll use my own nameservers and enter Hostinger’s nameservers:
ns1.dns-parking.comns2.dns-parking.com
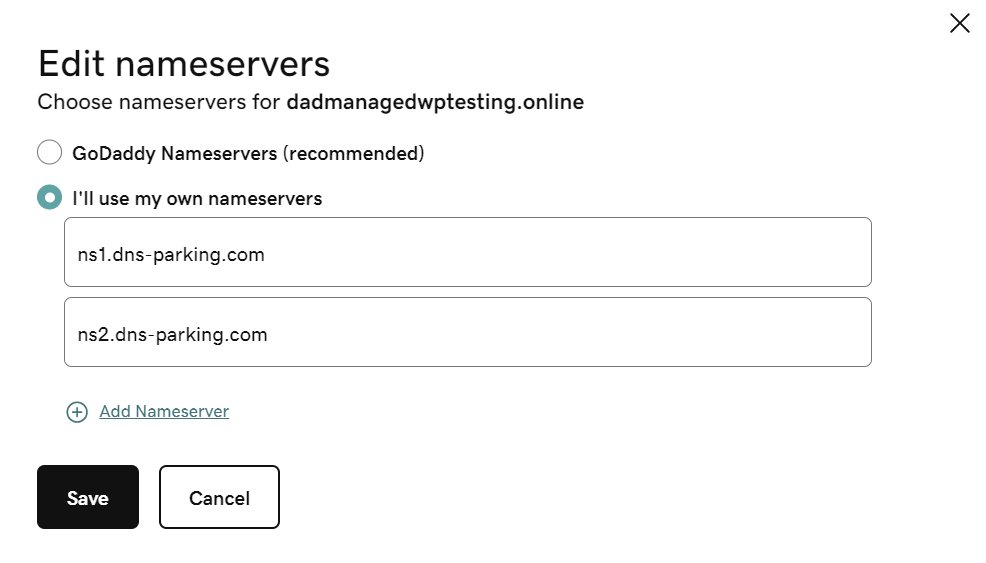
- Click Save. The DNS will take up to 24 hours to fully propagate worldwide.
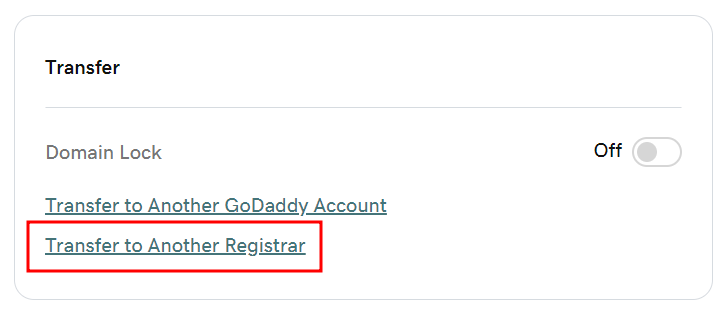
3. Get the Authorization Code
Follow these steps to receive your authorization code from GoDaddy:
- Open the Domain Portfolio page and click on the domain you want to transfer.
- Scroll down to the Transfer section and click Transfer to Another Registrar.
- Review the transfer checklist and select Continue.
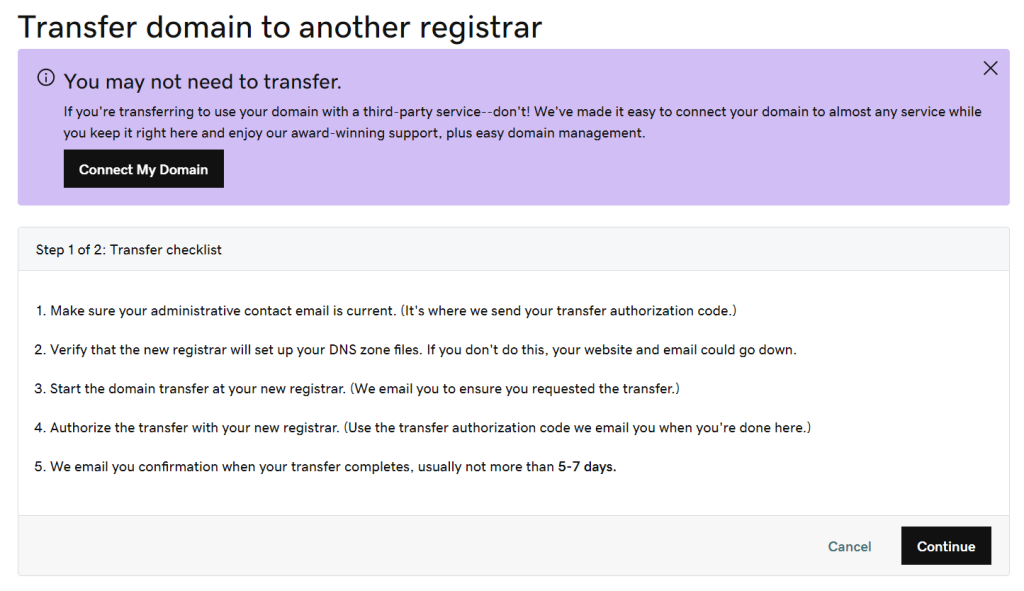
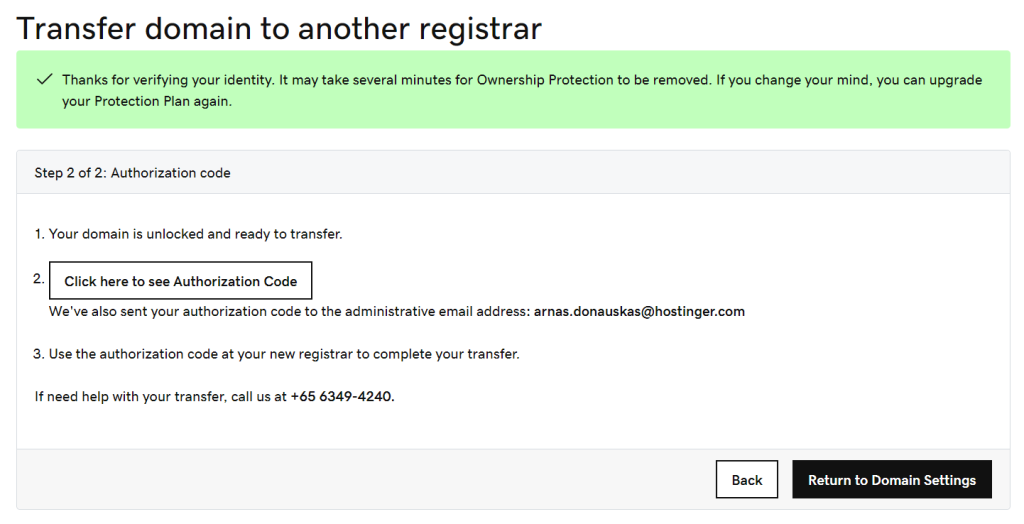
- Read the final disclaimer and click Continue. This step deactivates domain privacy to ensure the contact details are transferred to the new registrar.
- Select Click here to see Authorization Code to reveal the code. GoDaddy will also send it to your domain’s administrative email address.
4. Initiate the Domain Transfer to Hostinger
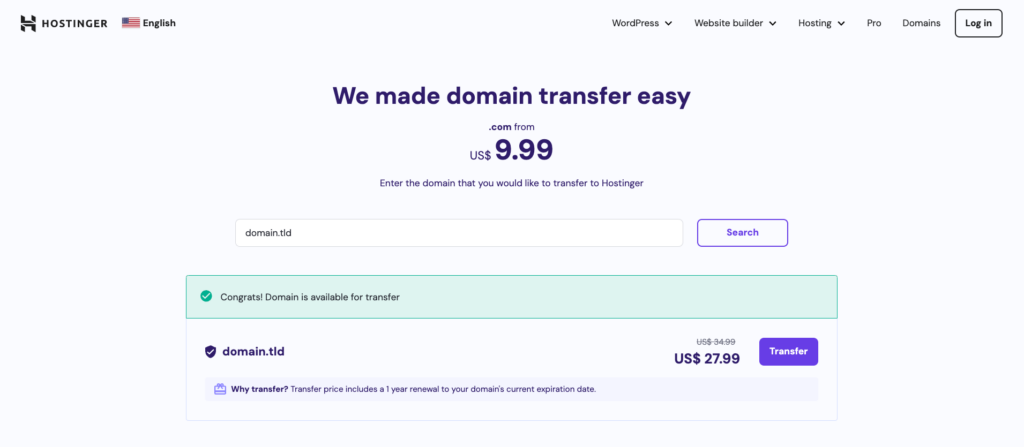
If you don’t have a Hostinger account yet, go to the Hostinger Domain Transfer page. Simply enter the domain you wish to transfer and follow the instructions.
If you already have a hosting account with Hostinger, you can initiate the transfer via hPanel:
- Log in to hPanel and go to Domains → Transfers.
- Select Transfer domain to Hostinger.
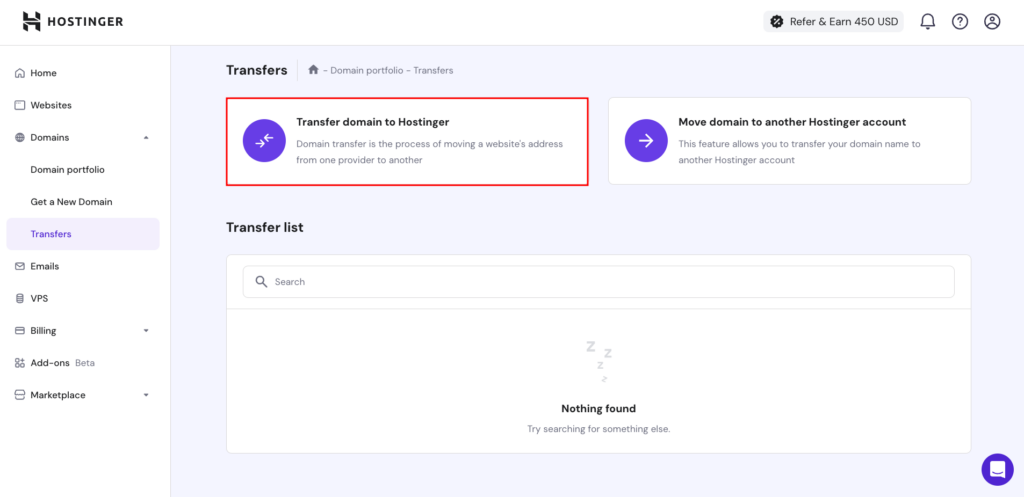
- Enter the domain you want to move from GoDaddy to Hostinger and hit Transfer.
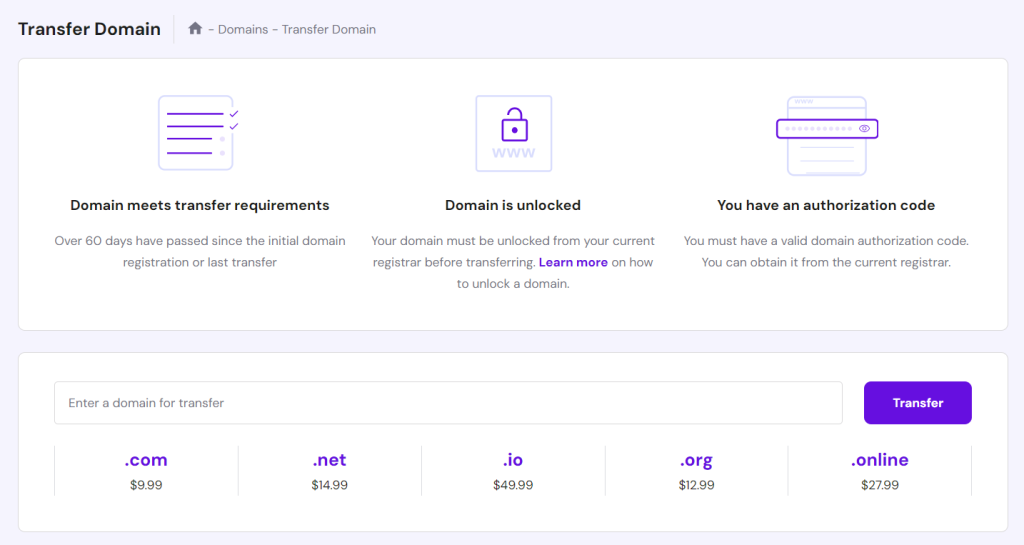
- You’ll see the domain transfer price, which includes renewal. Click Purchase to proceed.

- After making the payment, enter the authorization code you copied from GoDaddy and select Use Hostinger nameservers.
- Confirm the transfer via the email sent to you.
The domain transfer process usually takes between five to seven days to complete, depending on your domain extension and GoDaddy’s transfer policy.
Pro Tip
Don’t forget to cancel your GoDaddy account if you no longer need its services so you don’t get overcharged.
Important Links & Information Table
| Step | Action | Link |
|---|---|---|
| 1 | Unlock your domain | GoDaddy Domain Portfolio |
| 2 | Change nameservers | GoDaddy DNS Management |
| 3 | Get authorization code | GoDaddy Transfer Domain |
| 4 | Start transfer to Hostinger | Hostinger Domain Transfer |
| 5 | Check transfer status | Hostinger hPanel |
By following this guide, you can ensure a seamless domain transfer experience from GoDaddy to Hostinger.
FAQ about How to Transfer Domain from GoDaddy to Hostinger in 2025?
How long does it take to transfer a domain from GoDaddy to Hostinger?
The domain transfer process usually takes 5-7 days, depending on your domain extension and GoDaddy’s transfer policy.
Will my website go down during the transfer?
No, if you update your nameservers to Hostinger’s before the transfer, your website should remain active.
How much does it cost to transfer a domain to Hostinger?
The domain transfer price varies but typically includes one year of renewal. Check Hostinger’s pricing for your specific domain.
Can I transfer an expired domain from GoDaddy to Hostinger?
No, you must renew your domain before initiating a transfer.
What happens to my email accounts after transferring the domain?
If your email services are tied to GoDaddy, they may stop working. Consider migrating your email services before transferring.
Can I cancel the domain transfer?
Yes, you can cancel the transfer before it is completed, but you may not receive a refund.
Do I need to inform GoDaddy after the transfer?
No, but you should cancel your GoDaddy account if you no longer need their services to avoid auto-renewal charges.
Conclusion
Moving your domain name from GoDaddy to Hostinger is not as complicated as it may seem. After making sure your domain name is eligible for transfer, follow these four simple steps:
- Unlock the domain name
- Point the domain name to Hostinger’s nameservers
- Get the authorization code
- Initiate the domain transfer to Hostinger
Simple, right? If you still have questions about the process, check out the FAQ section or leave a comment below.